AddTransaction Widget
Features
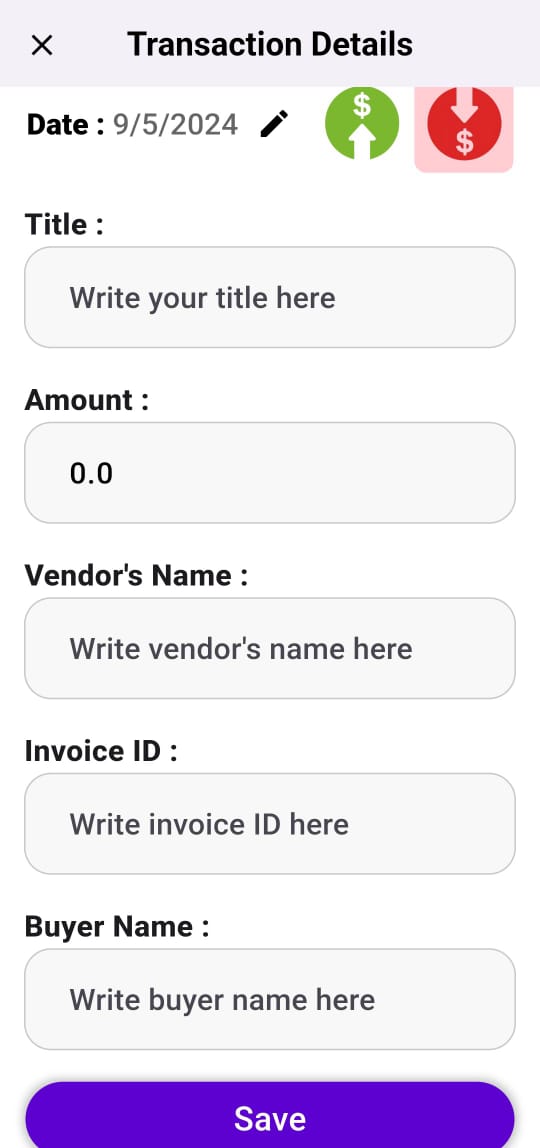
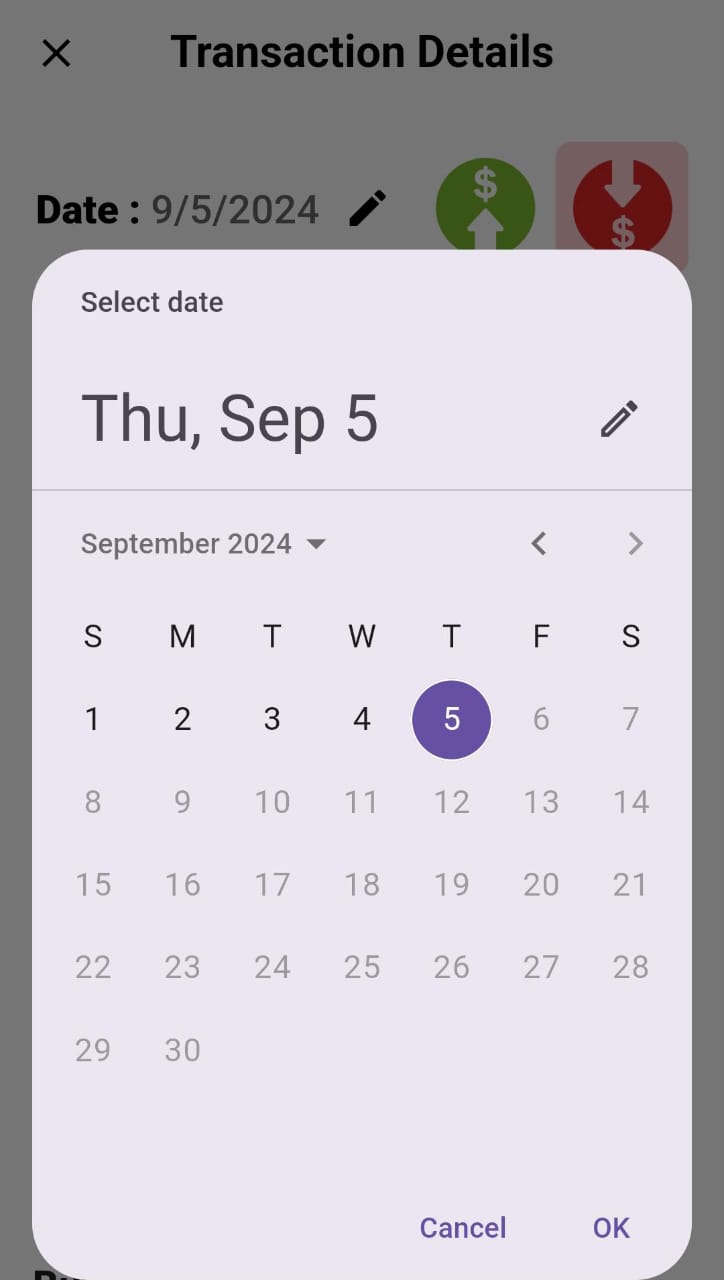
Date:Users can pick a date using the custom date pickerIncome/Expense:Users can mark a transaction as either Income or ExpenseForm Fields:Includes fields for entering the transaction title, total amount of transaction, vendor’s name, invoice ID, and buyer’s nameSave Transaction:Saves the transaction details in the app databaseDelete Transaction:Users can delete a transaction they have previously savedPhoto Gallery:Users can select an existing photo to upload on the appCamera:Users can click a photo directly from their phone and upload on the app
Key Components
ImgService Class
The ImgService class handles image selection and processing in the app. It provides functionalities to select images from the gallery or capture them using the camera, and then processes these images by sending them to a server.
Photo Gallery Function
The Photo Gallery feature allows users to select and upload an image from their device’s photo gallery. The selected image is then processed and analyzed. This functionality is implemented using the ImgService class, which leverages the ImagePicker package for image selection and Dio for HTTP requests.
Function Description:
The function opens the device’s photo gallery to pick an image using picker.pickImage(source: ImageSource.gallery)If an image is selected (pickedFile != null), creates a File object from the image path and shows a LoadingPage while processing the image.The function calls sendImageToModel Function so that the selected image can be processed and neccessary details can be extracted. As soon as the image is processed, the LoadingPage is closed and Completer is completed with the retrieved data.
Capture with Camera Feature
Overview
The “Capture with Camera” feature allows users to take a photo using their device’s camera and process the captured image for further use. This feature is implemented using the ImagePicker package to access the device’s camera and capture an image. The image is then sent to a server for processing.
Detailed Explanation
Components
-
ImagePicker- Purpose: Provides access to the device’s camera or gallery for selecting images.
- Initialization:
final picker = ImagePicker(); - Usage: Used to pick images from the camera.
-
showOptionsFunction- Purpose: Displays a modal action sheet that allows the user to choose between capturing an image with the camera or selecting from the gallery.
Capturing Image with Camera
-
Camera Action
- Purpose: Allows the user to take a photo using the device’s camera.
-
Trigger:
CupertinoActionSheetAction( child: const Text('Camera'), onPressed: () async { // Close the options modal Navigator.of(context).pop(); // Get image from camera final pickedFile = await picker.pickImage(source: ImageSource.camera); if (pickedFile != null) { _image = File(pickedFile.path); // Show the LoadingPage showDialog( context: parentContext, barrierDismissible: false, builder: (_) => const LoadingPage(), ); var data = await sendImageToModel(context, _image!); Navigator.of(parentContext).pop(); completer.complete(data); // Complete the completer with fetched data } }, ), - Overview: The
CupertinoActionSheetActionfor the camera allows users to capture a photo directly from their device’s camera. If a photo was successfully taken, it is converted into aPickedFileobject. Then thePickedFileobject is converted intoFileobject. The image is sent to a server for further processing using thesendImageToModelfunction. A loading page is displayed while the image is being processed. The loading page is removed as soon as the image processing is done.
-
Functions Called:
picker.pickImage(source: ImageSource.camera)- Purpose: Opens the device camera and allows the user to capture a photo.
- Parameter:
ImageSource.cameraspecifies that the image should be taken from the camera. - Returns: A
PickedFileobject if the user successfully captures an image.
sendImageToModelFunction
sendImageToModel Function
-
Purpose: Sends the captured image to a server for processing.
-
Function Definition:
Future<Map<String, dynamic>> sendImageToModel(BuildContext context, File imageFile) async { const url = "http://52.140.76.58:8000/api/upload/"; FormData formData = FormData.fromMap({ 'file': await MultipartFile.fromFile(imageFile.path, filename: 'upload.jpg'), }); try { Response response = await dio.post(url, data: formData); if (response.statusCode == 201) { log.i('Response JSON: ${response.data}'); var data = await fetchDetectedData(response.data['file']); return data; } else { log.i('Failed to send image. Status code: ${response.statusCode}'); log.i(response); } } catch (e) { log.i('Error occurred while sending image: $e'); } return {}; } -
Function Overview: The
sendImageToModelfunction is responsible for sending an image file to a remote server for processing and retrieving the resulting data. The function uses theDiopackage for making HTTP requests and handles the response to fetch additional detected data. Constanturlspecifies the endpoint for uploading the image.dio.postis used to make HTTP POST request, which sends theformDatacontaining the image file to the server, where it is processed to retrieve important data.
-
Summary
- The “Capture with Camera” feature allows users to take a photo using the device’s camera.
- It utilizes the
ImagePickerpackage to access the camera. - The
showOptionsfunction provides a modal action sheet with options to either capture an image or select one from the gallery. - Upon choosing the camera option, the image is captured and processed by the
sendImageToModelfunction. - The captured image is sent to a server, and the server’s response is used to update the application’s state.
Transaction Details
This is the main page where all the details for a particular Transaction can be filled by the user. 
Date
_dateValue is set to the parsed date from widget.initialData['date']. If the date format is incorrect or not provided, _dateValue is defaulted to the current date (DateTime.now()). The setDate method is used to allow the user to select a date of their choice for the transaction. The setDate updates _dateValue with the new date.

Expense/Income
Users can select whether a transaction is to be termed as an Income or Expense. This functionality is being implemented by using two IconButton widgets. As soon as the user clicks the Income Button, isExpense state is set to false. As soon as the isExpense is set to false, the background colour is set to green, indicating that ‘Income’ is currently selected. If the user selects the Expense Button, isExpense is set to true, which sets the background color to light red.setState is used to set the value of isExpense to true or false.
Title
_titleController manages the text input for the title field, which allows the user to add a title for the transaction. The entered title is accessed via _titleController.text and is used in transaction creation or updates.
Amount
Users input the amount into the TextField, which is managed by _amountController. The text changes are immediately reflected in _amountController. Once the form has been saved by the user, the amount is retrieved from _amountController.text and converted to a double for further use.
Other Details
Users can also input other details like Vendor’s Name, Invoice ID and Buyer Name while editing the details. After editing all the details, users can save the transaction history. Users can also delete an existing history in the same menu.